I’m in the midst of analyzing the detective game The Painscreek Killings (EQ Studios, 2017) right now, and as part of my process I ended up creating a quite detailed walkthrough. Since the work was already done, I figured I’d paste it over here, throw on some spoiler tags, and share it with the world. Might as well be generous.
There are a couple of other walkthroughs for Painscreek Killings out there, including this one here and this one here. I thought there was room on the internet for another walkthrough, though—one that was compact and consistently formatted. What follows are streamlined but nonetheless thorough details on how to proceed through the game.
Here’s a breakdown of how I’ve labeled things below:
A gate is anything that obstructs your progress—usually a locked door, locked drawer, or literal locked gate.
Keys are absolutely necessary to get past a given gate in the game. These can be key items (literal physical keys, usually) that get added to your inventory, or key info (codes and puzzle hints) that often does not.
Clues point you in the direction of keys and solutions. They are not, however, mandatory. It is always possible (if unlikely) to stumble your way to the things indicated by clues just by exploring the world.
Embedded keys and clues are bits of information attached to an object that are important, but might not be immediately apparent: the date of a correspondence, a number stamped on a keepsake, a code mentioned in the pages of a diary, and the like.
Because of the nature of the game’s design (which is what I’m attempting to describe in my analysis), there is always going to be some amount of backtracking involved in it. The order I’ve listed the game’s locations in below minimizes backtracking as best as possible, without eliminating it.
Happy detecting!
Sheriff’s Office
- access requires: Nothing required. Open from beginning of game.
- grants immediate access to:
- flashlight (bookcase by door)
- map of Painscreek (bookcase by door)
- voicemail from Steven Moss (interact with fax machine)
- Newspaper: Vivian Roberts’ death (bulletin board)
- Newspaper: Brooks apprehended (desktop)
- Diary: James Howard, 1995 (desk bottom drawer)
- Document: Sheriff’s relocation (windowsill)
- key item: sheriff’s desk key (on the carpet beneath the desk)
- key info: note indicates that code to cemetery gate is 1131 (taped on window outside)
- gated: top desk drawer
- access requires: sheriff’s desk key
- where to find it: Sheriff’s Office > carpet beneath desk
- grants access to:
- Document: Vivian Robert’s murder case report (top desk drawer)
- key item: gate key to Painscreek proper (top desk drawer)
- gated: filing cabinet
-
- access requires: 4-digit code: 7741
- where to find it: Anne’s Courtyard Inn & Suites > Room 201 (gated) > Steven Moss’ briefcase (gated) > slip of paper with several notes scrawled on. “7741” is written directly under the note “call Sheriff James, check his file.”
- grants access to:
- Document: Coroner’s undisclosed report (top drawer)
- Document: Record of alibi (2nd drawer down)
- key item: Steven Moss’ car key (bottom drawer)
-
Gate to Painscreek Proper
- access requires: gate key to Painscreek proper
- where to find it: Sherrif’s office > top desk drawer (gated)
- grants immediate access to:
- Entire rest of the game. Since this is such a basic gate, I’m not going to include it under any future lists of access requirements.
Painscreek Community Hospital
-
- access requires: Nothing required. Open as soon as you get into town.
- grants immediate access to:
- flashlight (redundant) (main reception desktop)
- sign-in sheet (main reception desktop)
- space occupancy chart with room numbers (main reception desk drawer)
- map of hospital (all floors) (nurses’ station, bulletin board)
- Diary: Wanda Tyler, 1995 (rm 102, stand with flowers)
- note from Hannah to her friend Nicole. (This isn’t actually important, but it does list possible locations to bury a time capsule. Although Hannah and Nicole presumably never got to hide their secret stash, these locations were popular among other characters.) (rm 206, middle drawer of wooden nightstand)
- clue item: note stating that the key for the Painscreek Trinity Church is sometimes stored under the flower pot next to the church (redundant—see also Mayor’s mansion) (main reception desktop)
- embedded key info: a fancy pin has “1964” stamped its back (main reception desk drawer)
- key item: key to medical records room (nurses’ station, top desk drawer)
- key item: key labeled “Wanda Tyler” (nurses’ station, cardboard box on table)
- key item: Henry Johnson’s keycard (emergency room area, on bench)
- gated: medical records room
- access requires: key to medical records room
- where to find it: Hospital > nurses’ station > top desk drawer
- grants access to:
- partial interview with a non-responsive Trisha Roberts (tape player on desk)
- drug prescription paperwork (This can be used a source of home addresses for Andrew Reed and Wanda Tyler. However it’s not as convenient as the Mansion’s worker list, because it doesn’t get added to your documents inventory. It also fleshes out the story some by offering a glimpse into the medical histories of the characters.) (spread across multiple drawers of the filing cabinets)
- key info: note that the nurse Katherine lost a pin in the basement storage, and that it has been returned to the reception area (desk, middle drawer)
- gated: Katherine’s locker at the nurses’ station
- access requires: 4-digit code: 1964
- steps involved:
- A note in the desk in the medical records room indicates that Katherine, a nurse, has lost a pin.
- We can find that pin in a drawer in the main reception desk.
- “1964” is stamped on its back of the pin. It’s the code to this locker.
- grants access to:
- Other: Nurse logbook
- gated: hospital basement
- access requires: The door is locked, and it can’t be unlocked from this side. In order to get through it, you’ll have to re-enter the hospital from the town sewers.
- gated: Dr. Henry Johnson’s office
- access requires: Henry Johnson’s keycard + restoring the power
- steps involved:
- Grab the keycard from a bench in the emergency room area, just a few meters north of his office. Unfortunately, picking the card up triggers a power outage (scripted), rendering the electronic card reader useless.
- Exit the hospital and re-enter its basement through the Painscreek sewers once you have the sewer access key (Scott Brooks’ cabin (gated) > basement (gated) > secret room (gated) > desk large center drawer)
- Return to this floor and swipe the keycard.
- grants access to:
- multiple voicemail messages for Dr. Johnson (interact with phone on desk)
- Document: Fund fraud investigation (by fax machine)
- Document: Threat letter to Henry (second drawer from bottom, right side of desk)
- Document: Henry’s reply to Charles (second drawer from bottom, right side of desk)
- key item: Key to hospital rm 203 (second drawer from bottom, left side of desk)
- gated: room 203
- access requires: Key to hospital rm 203
- where to find it: Hospital > Dr. Henry Johnson’s office (gated) > second drawer from bottom, left side of desk
- grants access to:
- Newspaper: Scott Brooks’ death (bottom drawer of nightstand)
- Diary: Dorothy Patterson, 1995-2 (top drawer of nightstand)
- key item: key to bedroom at Dorothy’s house (top drawer of nightstand)
Painscreek Trinity Church
- access requires: Church key
- where to find it: There are two redundant notes indicating where the church key is kept: one on the front desk of the Painscreek Community Hospital, and one stuck to the refrigerator in the Mayor’s mansion. It’s in a flower pot on the church grounds.
- grants immediate access to:
- Newspaper: Andrew Reed’s death (pew)
- flashlight (redundant) (main altar)
- Newspaper: Scott pleads ‘not guilty’ (Father Matthew’s office, 2nd drawer on right side of desk)
- Diary: Scott Brooks, 1985 (Scott’s room, top desk drawer)
- embedded clue: In addition to mentioning a “secret space” in his room, the May 3rd entry of Scott’s 1985 diary also describes his excitement with a toy plane.
- embedded key info: the wooden toy airplane has “May 3rd 1985” etched onto its bottom (Scott’s room, desktop)
- key item: key to tool storage room (with explanatory note) (Father Matthew’s office, top drawer left side of desk)
- gated: Scott’s secret wall safe
- access requires: knowledge of where the secret cubbyhole is + 4-digit code: 5385
- steps involved:
- The May 3rd entry of Scott’s 1985 diary mentions that Father Matthew made a “secret space for me in my room.” He also mentions liking a wooden toy plane that Father Matthew made.
- The secret cubbyhole is located behind the poster of planes. It now houses a wall safe.
- The date Scott was given his toy plane is revealed in the diary entry, and it also etched on the plane itself. The code is this May 3rd 1985, rendered as “5385.”
- grants access to:
- Diary: Scott Brooks, 1990
- key info: note in here lists the code to Trisha and Scott’s “secret hideout” as having been changed to 8831
- gated: tool storage room
- access requires: key to tool storage room
- where to find it: Painscreek Trinity Church > Father Matthew’s office > top drawer on left side of desk
- grants access to:
-
- key item: “Slim Jim” car lock pick (in the tool box on the shelf)
- gated: Chest labeled “Scott’s Things”
- access requires: chest key
- where to find it: Scott’s cabin (gated) > small stand with phonograph on it, bottom drawer
- grants access to:
-
- Diary: Scott Brooks, 1993-2
- Document: Sister Rachel’s confession
- key item: Scott’s cabin basement key
-
-
- gated: Father Matthew’s bedroom
- access requires: key to Father Matthew’s bedroom
- where to find it: Scott Brooks’ cabin (gated) > stand by the couch with the phonograph on it, bottom drawer
- grants access to:
- Document: Matthew hires lawyer (drawer in nightstand to the right of bed)
- Diary: Matthew Brooks, 1975 (drawer in nightstand to the left of bed)
- Diary: Matthew Brooks, 1971 (cardboard box inside wardrobe)
- embedded clue: In the October 27th entry of his 1971 diary, Matthew lists his 3 favorite places in town.
- gated: Cabinet built into confessional seat (right side)
- access requires: 6-digit code: 102402
- steps involved:
- In the middle drawer of the desk in rm 201 (gated) of Anne’s Inn, Steven Moss has left a photo of the confession booth seat with “The code is Calvin’s date of birth?” written on the back. This refers to Father Matthew’s predecessor, Father Calvin.
- Father Calvin is interred in the Painscreek Cemetery. Most of the headstones in the cemetery don’t have exact dates of birth and death, but luckily his does.
- Father Calvin’s date of birth was October 24, 1902. That gets rendered here as 102402.
- grants access to:
- Document: Sylvia’s confession letter
- gated: locked top drawer on right side of Father Matthew’s desk
- access requires: 4-digit code: 0318
- steps involved:
- The code is the birthday of someone Father Matthew was close to: Sofia.
- Follow the scavenger hunt to Sofia’s hidden gift (requires both Steven Moss’ 1997-3 diary and Matthew Brooks’ 1971 diary)
- Sofia’s birthday is March 18th. That gets rendered here as 0318.
- grants access to:
- Diary: Matthew Brooks, 1995
- gated: hidden attic
- access requires: knowledge of where hidden switch is + 19th-century church key
- steps involved:
- In the lockbox for rm 201 (gated) behind reception desk of Annes’ Courtyard Inn & Suites, Steven Moss kept a photo of a light fixture with “What’s the button for?” written on the back. That light fixture is here in Father Calvin’s office.
- Press the button sticking out of the bottom of the fixture to cause the fixture to shift, revealing a hidden keyhole.
- insert the 19th-century church key into the keyhole.
- grants access to:
- bloody axe (desktop)
- Sophia’s letter to Matthew (top drawer, right side of desk)
- Calvin’s confession letter (middle drawer, right side of desk)
- Tape with Father Matthew’s confession to the murders of Andrew Reed, Henry Johnson, Vivian Roberts, and (implicitly) Steven Moss. Once you play this tape, the endgame is initiated, and you can no longer save. (bottom drawer, right side of desk)
- gated: basement door
- access requires: You can’t open this door through conventional means. It’s unlocked as part of the events of the story in the endgame.
Steven Moss’ abandoned car, outside Anne’s Courtyard
- access requires: “Slim Jim” car lock pick
- where to find it: Painscreek Trinity Church (gated) > tool storage room (gated) > toolbox on shelf
- grants immediate access to:
- photo of Sofia with “The secret lies with her” written on the back
- Steven Moss’ PI license
- Diary: Steven Moss, 1997-1
- Document: Hiring P.I. Steven Moss
- embedded key info: the code to the mayor’s mansion security room, 025241, is written on the last page of the 1997-1 diary
- gated: glove compartment
- access requires: Steven Moss’ car key
- where to find it: Sheriff’s office > filing cabinet (gated) > bottom drawer
- grants access to:
- Diary: Steven Moss, 1997-4
- key item: key to lockbox for Anne’s Courtyard Inn & Suites, rm 201
Mayor’s mansion
- access requires: Nothing required. Open as soon as you get through Painscreek gate.
- grants immediate access to:
- flashlight (redundant) (family room, on table)
- Newspaper: Henry Johnson’s death (family room, on table)
- Document: J&L’s appreciation letter (middle drawer of small stand with fax machine on it)
- Mayor’s mansion 2nd floor map (library)
- Diary: Mary Martinez, 1993 (laundry room, on dryer)
- Diary: Charles Roberts, 1993 (gallery space, on loveseat)
- Newspaper: Coal mine incident (bar, on the bar itself)
- clue item: note stating that the key for the Painscreek Trinity Church is sometimes stored under the flower pot next to the church (redundant—see also Painscreek Community Hospital) (kitchen, posted to refrigerator)
- clue item: note indicating there’s a key to the maid’s room in the kitchen (posted on the maid’s room door)
- key item: key to maid’s room on second floor (kitchen, middle drawer in kitchen island)
- key item: key to Bernard Hopkin’s residence (exercise room, inside Bernard’s locker)
- embedded key info: a note from the maid Mary indicates that tea time is at 3:20 PM (second floor balcony across from Trisha’s Room, under couch leg)
- gated: maid’s room
- access requires: key to maid’s room
- where to find it: Mayor’s mansion > kitchen > middle drawer in kitchen island (This is indicated, somewhat vaguely, by the note on the door)
- grants access to:
- Diary: Mary Martinez, 1995
- note about Scotts’s suspicious behavior
- note about Mrs. Roberts’ hate mail
- gated: attic
- access requires: Mayor’s mansion attic key
- where to find it: Mayor’s mansion grounds > shed (a.k.a. Trisha and Scott’s “secret hideout”) (gated) > shelf
- grants access to:
- key info: instructions to “The Benfield,” the clock in the Roberts’ tea room. Apparently, it hides a secret safe. A note scrawled on the instructions says “Tea Time?”
- unlock point: go down the stairs in here to unlock Derrick Tyler’s garage area on the ground floor
- gated: security room
- access requires: 6-digit code: 025241
- where to find it: Steven Moss’ car (gated) > Diary: Steven Moss, 1997-1 > note on the last page
- grants access to:
- Document: Mansion’s worker list (This employee information booklet is very useful. It’s the only reference for characters’ home addresses that can actually be carried around in your inventory.) (green binder on desk)
- Other: Mansion security logbook (table next to fax machine)
- key item: key to nanny’s room (key pegs near door)
- key item: key to tea room (key pegs near door)
- key item: key to Trisha’s room (key pegs near door)
- gated: nanny’s [Dorothy’s] room
- access requires: key to nanny’s room
- where to find it: Mayor’s mansion > security room (gated) > key pegs near door
- grants access to:
- Diary: Dorothy Patterson, 1973 (nightstand)
- Diary: Dorothy Patterson, 1995-1 (desk, middle drawer)
- Document: Dorothy’s leaving letter (desktop)
- gated: tea room
- access requires: key to tea room
- where to find it: Mayor’s mansion > security room (gated) > key pegs near door
- grants access to:
- Document: Fund embezzlement notice (roll-top desk, top drawer on right side)
- collection of Vivian Roberts’ hate mail (roll-top desk, second drawer on left side)
- Diary: Vivian Roberts, 1972 (stand with green lamp on it, top drawer)
- key item: key to master bedroom (stand with green lamp on it, top drawer)
- gated: Benfield clock (western wall)
- access requires: knowledge of how to open secret compartment + clock key
- steps involved:
- instructions for opening the clock’s secret compartment are found in the attic (gated)
- The Roberts’ tea time (3:20) is indicated by a note on the balcony outside Trisha’s room.
- The clock key is in the nightstand to the left of the bed in the master bedroom (gated)
- Insert the key, set the hands to 3:20 exactly, then turn the key to open the clock face,
- grants access to:
- Document: Henry’s advice for Vivian
- gated: roll-top desk, large center drawer
- access requires: Mayor’s mansion tea room desk key
- where to find it: Bernard Hopkins’ residence (gated) > large center drawer of desk in upstairs office (gated)
- grants access to:
- Diary: Vivian Roberts, 1995
- gated: Trisha’s room
- access requires: key to Trisha’s room
- where to find it: Mayor’s mansion > security room (gated) > key pegs near door
- grants access to:
- note indicating Trisha is in the hospital (posted on wardrobe)
- Diary: Trisha Roberts, 1989 (in wardrobe)
- embedded key info: the code to the study, 44871, is written on the last page of the diary
- key item: key to Scott’s cabin (in wardrobe)
- gated: locked nightstand (to the left of Trisha’s bed)
- access requires: key to Trisha’s nightstand
- where to find it: Mayor’s mansion grounds > shed (a.k.a. Trisha and Scott’s “secret hideout”) (gated) > shelf
- grants access to:
- Diary: Trisha Roberts, 1994 (bottom drawer)
- key item: Scott’s metal cross (bottom drawer)
- key item: key to Dorothy Patterson’s residence (with explanatory note) (top drawer)
- gated: music box (in wardrobe)
- access requires: key to Trisha’s music box
- where to find it: Scott Brooks’ cabin (gated) > basement (gated) > secret room (gated) > middle drawer on right side of desk
- grants access to:
- Document: Scott’s letter to Trisha
- gated: master bedroom
- access requires: key to master bedroom
- where to find it: Mayor’s mansion > tea room (gated) > stand with green lamp on it, top drawer
- grants access to:
- Diary: Vivian Roberts, 1994 (nightstand on the left side of the bed, bottom cupboard portion)
- key item: clock key (nightstand on the left side of the bed, drawer)
- key item: key to Anne’s Courtyard Inn & Suites, rm 201 (on the floor, by the window)
- gated: study
- access requires: 6-digit code: 44871
- where to find it: Mayor’s mansion > Trisha’s room (gated) > wardrobe > Diary: Trisha Roberts, 1989 > note on the last page
- grants access to:
- Mayor’s mansion 1st floor map (on floor near the window)
- Document: Vivian’s medical report (desk, bottom drawer left side)
- key info: knight chess piece with a “5” written on the bottom (desk, bottom drawer left side)
- key info: pawn chess piece with a “2” written on the bottom (desk, bottom drawer left side)
- key item: Illustrated Medical and Health Encyclopedia, Vol 10 (desk, bottom drawer right side)
- embedded key info: An instruction set is written on the back cover for a cryptic clue: “4 right 6 left 3 right”
- gated: desk middle drawer
- access requires: 4-digit code: 5194
- steps involved:
- The first clue is provided by the letters above the number rings on the lock: “KQBK”
- Further clarification is provided on the final page of Charles’ 1995-1 diary, where he has written “Study Room Desk Hint: Chess pieces (K=king/knight, Q=queen, B=bishop)
- A king chess piece can be found in the hidden safe in the gallery (gated). It has a “4” written on the bottom.
- A knight chess piece can be found on the bottom drawer on the left side of this desk. It has a “5” written on the bottom.
- A queen chess piece can be found in the shed (a.k.a. Trisha and Scott’s “secret hideout”) (gated). It has a “1” written on the bottom.
- A bishop chess piece can be found tucked into the time capsule buried near the rock in the Painscreek Cemetery (gated). It has a “9” written on the bottom.
- “KQBK” is ambiguous. It could stand for either “King-Queen-Bishop-Knight” (4195) or “Knight-Queen-Bishop-Knight” (5194). That’s not a lot of possibilities, so try them both.
- grants access to:
- Diary: Charles Roberts, 1995-2
- Beckerd’s investigation #1
- Beckerd’s investigation #2
- gated: hidden study annex
- access requires: Illustrated Medical and Health Encyclopedia, Vol 10
- steps involved:
- Pick up the Medical Encyclopedia Vol 10 from the bottom drawer on the right side of the desk.
- Place Vol 10 in the empty place where it goes among the other volumes on the bookcase.
- Push the spine of Vol 14 (forth volume from the right)
- Push the spine of Vol 6 (sixth volume from the left)
- Push the spine of Vol 15 (third volume from the right). The bookcase will move, revealing the door to a hidden annex.
- grants access to:
- Newspaper: Magdalene Roberts’ death (in cardboard box)
- Diary: Charles Roberts, 1974-1 (on shelving unit)
- Diary: Charles Roberts, 1974-2 (on shelving unit)
- Document: Magadalene visit Charles (on shelving unit)
- photo of Sofia (on shelving unit)
- gated: hidden safe in gallery
- access requires: knowledge of where the hidden safe is + 6-digit code: 611975
- steps involved:
- On the June 1 entry of Mary Martinez’s 1993 diary she mentions Charles Roberts staring long and hard on a painting of a middle-aged woman in the gallery’s central column
- There’s a button on the side of this painting. Push it, and a safe is revealed.
- In Steven Moss’ briefcase (gated) in rm 201 (gated) of Anne’s Inn, there is a note that says the code for the gallery safe is “Vincent’s birthday.”
- The June 1st entry of Sofia Miller’s 1975 journal states that her son was born on that day, and the Jun 16th entry establishes that Charles Roberts named the son “Vincent”
- “Vincent”s date of birth was June 1, 1975. That gets rendered here as 611975.
- grants access to:
- Document: Charles’ will
- Diary: Charles Roberts, 1995-1
- embedded key info: Written the last page of Charles’ 1995-1 diary: “Study Room Desk Hint: Chess pieces (K=king/knight, Q=queen, B=bishop)
- key info: king chess piece with a “4” written on the bottom
Mayor’s mansion surrounding grounds: Derrick Tyler’s garage
- access requires: Although you can see into the windows of this workshop from the mansion grounds, the door is locked, and it can’t be unlocked from the outside. Directly above this out-building is the Roberts’ attic, which is accessible through a second-floor passageway. You can unlock the door coming through that direction. (See “attic” above.)
- grants immediate access to:
- Diary: Derrick Tyler, 1993
Mayor’s mansion surrounding grounds: shed (a.k.a. Trisha and Scott’s “secret hideout”)
- access requires: 4-digit code: 8831
- where to find it: Painscreek Trinity Church (gated) > Scott’s room > Scott’s secret wall safe (gated) > note
- grants immediate access to:
- note stating that Oliver Gibson is in possession of both a shovel and a wrench (by door)
- Diary: Trisha Roberts, 1993 (on shelves)
- key info: queen chess piece with a “1” written on the bottom (on shelves)
- key info: rook chess piece with a “7” written on the bottom (on shelves)
- key item: Mayor’s mansion attic key (on shelves)
- key item: key to Trisha’s nightstand (on shelves)
Anne’s Courtyard Inn & Suites
- access requires: Nothing required. Open as soon as you get into town.
- grants immediate access to:
- flashlight (redundant) (main service desk, side facing door)
- guest directory (main service desk, side facing door)
- voicemail from Oliver Gibson cluing us into the fact that a toolbox and shovel are in his photo lab and that his keys are with Dorothy Patterson (interact with phone on reception desk)
- Newspaper: Hospital closed (reception desktop)
- guide to some addresses around the town, of limited usefulness (cleaning closet)
- clue item: guide to using Slim Jim lock picks (not vital, but provides an indication of how to get into Steven Moss’ car outside) (bulletin board)
- clue item: guide to darts scoring (This doesn’t get added to your documents. If you’re not familiar with the scoring system for darts, you should take a photo of it, as it’s crucial for a later puzzle.) (posted to wall, near dart board)
- key item: key to rm 202 (key pegs near the door in the reception desk area)
- key item: key to rm 203 (key pegs near the door in the reception desk area)
- key item: key to rm 204 (key pegs near the door in the reception desk area)
- key item: key to 7 Black Pine Rd, with explanatory note (inbox on reception desk)
- gated: Rm 201
- access requires: key to Anne’s Courtyard Inn & Suites, rm 201
- where to find it: Mayor’s mansion > master bedroom (gated) > on the floor near the window
- grants access to:
- photo of ghostly figure on the roof of the hospital (desk, middle drawer)
- Diary: Steven Moss, 1997-2 (desk, top drawer)
- embedded clue: final page of Steven Moss’s 1997-2 diary describes the location of a hidden compartment in the reception desk area
- clue item: photo of a strange cross-shaped indentation on a wardrobe of some sort with “Where can I find the key?” written on it (desk, middle drawer)
- key info: photo of the confession booth seat with “The code is Clavin’s date of birth?” written on the back (desk, middle drawer)
- gated: Steven Moss’ briefcase (desktop)
- access requires: key to Steven Moss’ briefcase
- where to find it: Hospital basement (gated) > mortuary > on the floor in the corner next to Moss’ wallet and other personal effects
- grants access to:
- Document: Coroner’s public report
- key info: photo of darts positioned on a dart board (This doesn’t get added to your documents. Take a photo of it, as it is the only source of crucial info for a later puzzle.)
- key info: note with two important components: first, that the code for the gallery safe is Vincent’s birthday, and secondly the number “7741” written directly under the reminder “call Sheriff James, check his file.”
- gated: Rm 202
- access requires: key to Anne’s Courtyard Inn & Suites, rm 202
- where to find it: Anne’s Courtyard Inn & Suites > key pegs near the door in the reception desk area
- grants access to:
- hat (achievement item) (tucked under the foot of the wardrobe)
- gated: Rm 203
- access requires: key to Anne’s Courtyard Inn & Suites, rm 203
- where to find it: Anne’s Courtyard Inn & Suites > key pegs near the door in the reception desk area
- grants access to: N/A—nothing in here
- gated: Rm 204
- access requires: key to Anne’s Courtyard Inn & Suites, rm 204
- where to find it: Anne’s Courtyard Inn & Suites > key pegs near the door in the reception desk area
- grants access to: N/A—nothing in here
- gated: hidden compartment behind reception desk
-
- access requires: knowing where the entrance point is
- where to find it: Anne’s Courtyard Inn & Suites > Rm 201 (gated) > desk, top drawer > Diary: Steven Moss, 1997-2 > final page has a written description of its location (image)
- grants access to:
- Other: Innkeeper’s logbook
-
- gated: lockbox for rm 201 behind reception desk
- access requires: key to lockbox for Anne’s Courtyard Inn & Suites, rm 201
- where to find it: Steven Moss’ car outside (gated) > glove compartment (gated)
- grants access to:
- Diary: Steven Moss 1997-5
- clue item: torn note where Steven announces he has hidden a key in a roadside drain
- clue item: photo of a light fixture with “What’s the button for?” written on the back
Scott Brooks’ Cabin
- access requires: key to Scott’s cabin
- where to find it: Mayor’s mansion > Trisha’s Room (gated) > wardrobe
- grants immediate access to:
- Diary: Scott Brooks, 1993-2 (stand by the couch with phonograph on it, bottom drawer)
- key item: chest key (stand by the couch with phonograph on it, bottom drawer)
- key item: key to Father Matthew’s bedroom (stand by the couch with phonograph on it, top drawer)
- gated: basement
- access requires: Scott’s cabin basement key
- where to find it: Painscreek Trinity Church > tool storage room (gated) > chest of “Scott’s Things” (gated)
- grants access to:
- Diary: Scott Brooks, 1994 (shelving unit)
- gated: Scott’s secret room
- access requires: Scott’s metal cross + knowledge of where it needs to be placed
- steps involved:
- Scott’s metal cross is in the locked nightstand (gated) of Trisha’s room (gated) in the Mayor’s mansion. The cross needs to be placed somewhere specific.
- In the middle drawer of the desk in rm 201 (gated) of Anne’s Inn, Steven Moss has left a photo of a cross-shaped indentation on a wardrobe of some sort with “Where can I find the key?” written on it
- In the corner of that photo is a water heating unit that matches the one in Scott’s basement. Follow the angle of the photograph to find a cover that conceals a hidden cross-shaped indentation on the wardrobe down here. Open the cover and place the cross in the indentation.
- Step into the wardrobe and pull the light switch. A door to a hidden room will open.
- grants access to:
- Scott’s conspiracy board, with updated map (Scott’s notes on this map don’t automatically transfer onto the map you’re holding) (above desk)
- Diary: Scott Brooks, 1995 (middle drawer, right side of desk)
- photo of Sofia with baby dated 06-21-1975 (top drawer, right side of desk)
- map of Painscreek sewers (desk large center drawer)
- key item: key to Trisha’s music box (top drawer, right side of desk)
- key item: Painscreek sewer access key (desk large center drawer)
- key item: old gate key (key pegs next to conspiracy board)
Mayor’s mansion surrounding grounds: garden and well
- access requires: old gate key
- where to find it: Scott Brooks’ cabin (gated) > basement (gated) > secret room (gated) > key pegs next to conspiracy board
- grants access to:
- Sofia’s broach
- embedded key info: the number 0526 is stamped onto the broach
Painscreek sewers and hospital basement
- access requires: Painscreek sewer access key
- steps involved:
- Get your hands on the sewer access key: Scott Brooks’ cabin (gated) > basement (gated) > secret room (gated) > desk large center drawer
- Unlock the old sewer entrance point camouflaged by trees along the small flight of steps tucked between Black Pine Rd and Maple Dr that serves as a shortcut to the Mayor’s mansion
- Proceed through the sewers to the hospital basement (there’s only one way)
- grants immediate access to:
- Steven Moss’ wallet (mortuary, on the floor in the corner)
- Diary: Steven Moss, 1997-3 (mortuary, on the floor in the corner)
- embedded clue: In the April 16th entry of the 1997-3 diary, Moss mentions that Matthew Brooks planned an elaborate scavenger hunt for Sofia, with clues spread across 6 places.
- key item: key labeled “B.H.” (mortuary, on the floor in the corner)
- key item: key to Steven Moss’ briefcase (mortuary, on the floor in the corner)
- key item: hammer (storage room, on the shelves)
- unlock point: hospital power reset switch (flip this to restore power and make Henry Johnson’s keycard useable) (electrical control room)
- unlock point: unlock the stairwell from this side to reconnect the basement to the rest of the hospital
Dorothy Patterson’s residence, 40 Black Pine Rd
- places where the address of this residence is mentioned:
- employee information booklet for the Mayor’s mansion
- Scott’s conspiracy board
- Mary Martinez’s diary, April 17th 1995 entry
- access requires: key to Dorothy Patterson’s residence
- where to find it: Mayor’s mansion > Trisha’s room (gated) > locked nightstand (gated) > top drawer
- grants immediate access to:
- Diary: Dorothy Patterson, 1975 (desk in Dorothy’s office, top righthand drawer)
- gated: second floor bedroom
- access requires: key to bedroom at Dorothy’s house
- where to find it: Painscreek Community Hospital > rm 203 (gated) > nightstand top drawer
- grants access to:
- Newspaper: Trisha Roberts’ death (nightstand, bottom drawer)
- Diary: Dorothy Patterson, 1995-3 (nightstand, top drawer)
- Document: Oliver’s letter to Dorothy (mantle)
- key item: key to Oliver’s Photography shop (key pegs next to mantel)
- gated: Sofia’s box (shelf near mantle)
- access requires: 4-digit code: 0526
- where to find it: Mayor’s mansion garden area (gated) > well > Sofia’s broach > number stamped on broach
- grants access to:
- Document: Matthew’s missionary work
- Diary: Sofia Miller, 1975
- embedded key info: Sofia’s diary details the birth of her son on June 1st, named “Vincent” by Charles Roberts
Oliver Gibson’s Photography Shop, 5 Walnut Ave
- access requires: key to Oliver’s Photography shop
- where to find it: Dorothy Patterson’s residence (gated) > second floor bedroom (gated) > key pegs next to mantel
- grants immediate access to:
- Document: Event Cancelled (office, through door past main desk, left drawer of table with fax machine on it)
- Diary: Oliver Gibson, 1996 (middle drawer, desk in office)
- key item: wrench (toolbox near desk)
- key item: shovel (next to toolbox)
Andrew Reed’s residence, 7 Black Pine Rd
- places where the address of this residence is mentioned:
- Drug prescription paperwork in the medical records room of the Painscreek Community Hospital
- employee information booklet for the Mayor’s mansion
- Scott’s conspiracy board
- Note next to the residence’s key in the main service desk area of Anne’s Courtyard Inn & Suites
- access requires: key to 7 Black Pine Rd
- where to find it: Anne’s Courtyard Inn & Suites > inbox on reception desk
- grants immediate access to:
- Document: Letter to Daniel (safe in burnt-out room on first floor)
- Diary: Andrew Reed, 1994 (second floor bedroom)
- “She is coming for us” ominously scrawled on wall (second floor bedroom)
- glimpse of Sofia’s ghost (across the river right after exiting the house the first time)
Bernard Hopkins’ residence, 31 Silverlake Blvd
- places where the address of this residence is mentioned:
- employee information booklet for the Mayor’s mansion
- Scott’s conspiracy board
- access requires: key to Bernard Hopkin’s residence
- where to find it: Mayor’s mansion > exercise room > Bernard’s locker
- grants immediate access to:
- shattered door to the display case holding the axes, which seems suspicious (hunting trophy room)
- Diary: Bernard Hopkins, 1994 (desk in upstairs office, second drawer from bottom, right side)
- key info: slip of paper with passwords and codes, including a hint to the desk’s locked drawer: “subtract the yellow darts’ points from the red darts’ total” (desk in upstairs office, second drawer from top, right side)
- gated: second floor bedroom
- access requires: key labeled “B.H.”
- where to find it: Hospital basement (gated) > mortuary > on the floor in the corner next to Moss’ wallet and other personal effects
- grants access to:
- X’ed out photo of Vivian Roberts (stand with lamp, bottom drawer)
- Diary: Bernard Hopkins, 1995-1 (stand with lamp, bottom drawer)
- Diary: Bernard Hopkins, 1995-2 (nightstand)
- gated: bloody board (floor of the office, near the wall)
- access requires: hammer
- where to find it: Painscreek Community Hospital > basement (gated) > storage room > shelf
- grants access to:
- bloody knife (achievement item)
- gated: large center drawer of desk in upstairs office
- access requires: 4-digit code: 0137
- steps involved:
- In the second drawer from top on the right side of this desk, Bernard has left a note that says that to unlock this drawer you must “subtract the yellow darts’ points from the red darts’ total”
- There is a dart board on the door of the study (close it to see). However, one of the red darts has fallen out of it, seemingly making this puzzle impossible.
- Thankfully, Steven Moss took a photo of the dart board while it was still intact. See Anne’s Courtyard Inn & Suites > Rm 201 (gated) > Steven Moss’ briefcase (gated).
- If you need a primer on how darts is scored, see the scoring guide in Anne’s Courtyard Inn & Suites.
- The red darts’ score is 36 + 60 + 50 = 146. The yellow darts’ score is 7 + 2 = 9.
- 146 – 9 = 137. Slap a 0 in front of it to make it 4 digits.
- grants access to:
- Diary: Bernard Hopkins, 1995-3
- key item: Mayor’s mansion tea room desk key
Wanda and Derrick Tyler’s residence, 43 Silverlake Blvd
- places where the address of this residence is mentioned:
- Drug prescription paperwork in the medical records room of the Painscreek Community Hospital
- employee information booklet for the Mayor’s mansion
- Scott’s conspiracy board
- access requires: key labeled “Wanda Tyler”
- where to find it: Painscreek Community Hospital > nurses’ station > cardboard box on table
- grants immediate access to:
- Diary: Wanda Tyler, 1974 (cardboard box in close of bedroom without telescope)
- Diary: Derrick Tyler, 1995 (bottom drawer of cabinet next to door. there’s a sheet draped over this cabinet, and only one drawer is openable, making this easy to miss)
- Diary: Derrick Tyler, 1990 (cardboard box in bedroom with telescope)
- embedded clue: On the April 1st entry of his 1990 diary Derrick mentions that he and Trisha planned to bury a time capsule “near a big stone in the cemetery”
- gated: jammed drawer on nightstand (bedroom without telescope)
- access requires: hammer
- where to find it: Painscreek Community Hospital > basement (gated) > storage room > shelf
- grants access to:
- Diary: Wanda Tyler, 1981
- Document: Derrick’s psychiatric report
Painscreek Cemetery
- access requires: Nothing required. The unlock code to the main gate, 1131, is found taped on window outside Sheriff’s Office. It’s the first code you can find in the entire game. However, by the time you get to the cemetery gate, it has already been unlocked by someone else.
- grants immediate access to:
- grave that’s marked only with a simply wooden cross
- embedded key info: Father Calvin Bennett’s headstone (Father Calvin’s headstone is the only on in the entire cemetery with exact dates of birth and death: October 24, 1902 – December 7, 1984. One of these dates is important to Father Calvin’s successor, Father Matthew.)
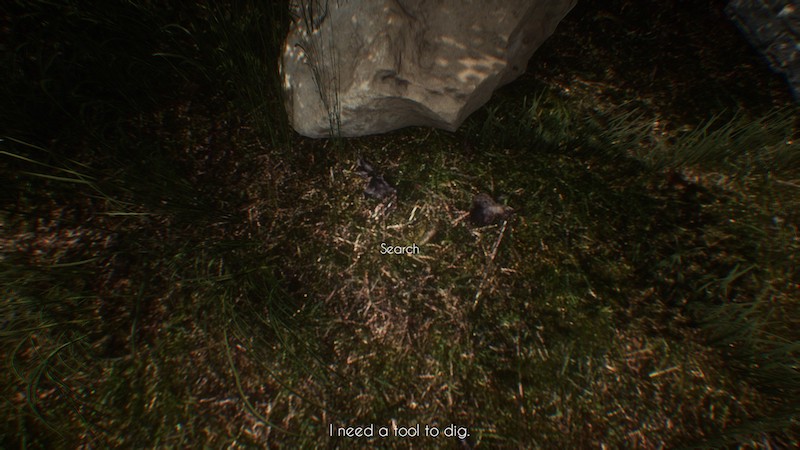
- gated: Buried time capsule
- access requires: knowledge of where the time capsule is buried + shovel
- steps involved:
- The April 1st entry of Derrick Tyler’s diary from 1990 mentions that he and Trisha planned to bury a time capsule “near a big stone in the cemetery”
- Looking at a patch of ground near the large stone brings up a “search” prompt. You can successfully do so once you have retrieved the shovel from Oliver Gibson’s photography shop (gated). (image)
- grants access to:
- Document: Derrick’s confession
- “Secrets of Painscreek” map
- key info: bishop chess piece with a “9” written on the bottom
Sofia’s hidden gift
- access requires: knowledge of where the gift is hidden + 4-digit code to unlock it: 1203
- steps involved:
- In the April 16th entry of Steven Moss’ 1997-3 diary, he mentions that Matthew Brooks planned an elaborate scavenger hunt for Sofia. A gift was hidden for her in town. Clues to its location were spread across 6 places: Sofia’s 3 favorite places in town, and Matthew’s 3 favorite places in town.
- Sofia’s 3 favorite places are Anne’s Courtyard Inn & Suites, the town’s main bridge, and the post office.
- The clue “bird” is written on the wall enclosing the bushes at Anne’s Courtyard Inn & Suites. (image)
- The clue “stump” is written on the inner east side of the town’s main bridge. (image)
- The clue “stream” is written on the cornerstone of the post office. (image)
- Steven Moss didn’t know where Matthew Brooks’ 3 favorite places where. However, we can find reference to them in his diaries.
- In the October 27th entry of his 1971 diary, Matthew lists the Moon Café, the Painscreek Trinity Church, and Little Big Books as his 3 favorite places in town.
- The clue “playground” is written on the cornerstone of the Moon Café. (image)
- The clue “1203” is written on the cornerstone of the Painscreek Trinity Church. (image)
- The clue “house” is written on the cornerstone of Little Big Books. (image)
- “Stream” lets you know the hidden gift box is near the river. “Playground” and “bird”+“house“ narrow down the location as being near the playground, and more specifically near the birdhouse. “Stump” is the actual location of the box. “1203” is the code for the box’s combination lock.
- grants access to:
- ring
- Document: Matthew’s letter to Sofia
- Document: Sofia’s birthday gift
- embedded key info: Sofia’s birthday—Matthew wrote the date, March 18th, on the card—is the solution to a combination lock elsewhere in the game
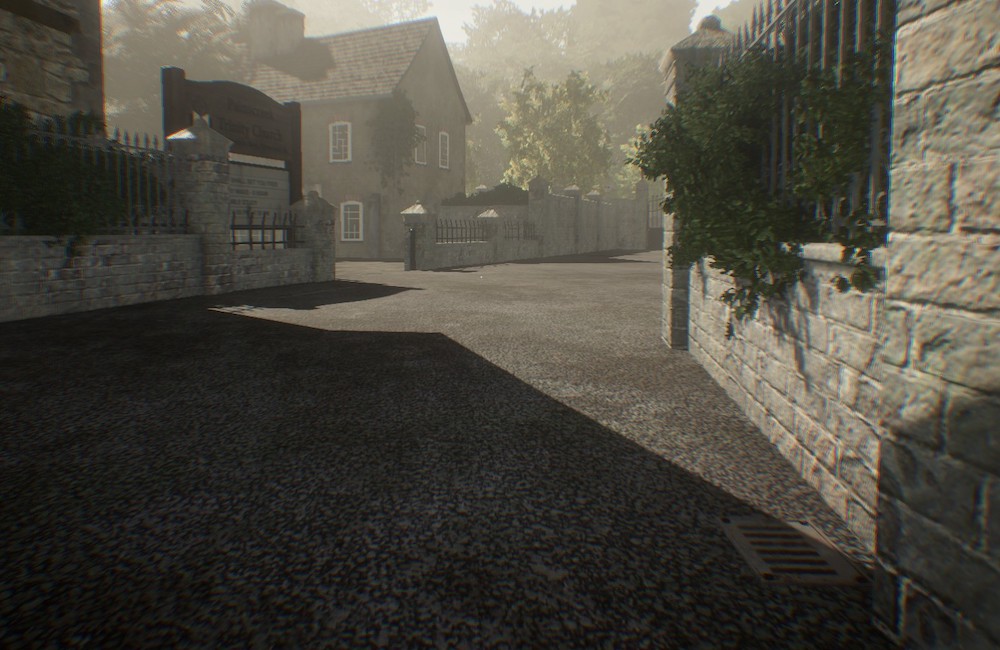
Roadside drain
- access requires: wrench + Steven Moss’ note indicating that he’s hidden a key in a roadside drain
- steps involved:
- Get your hands on the wrench: Oliver Gibson’s Photography Shop (gated) > tool box next to desk in back office
- See Steven Moss’ note about hiding something a roadside drain: Anne’s Courtyard Inn & Suites > lockbox for rm 201 behind reception desk (gated) > torn note
- Start taking the plates off of drains. This is annoying, because there are several of them scattered around the town, placed at unpredictable intervals.
- If you want to skip the random searching, the one you’re looking for is on the opposite side of the street from the Painscreek Trinity Church parking lot entrance (image)
- grants access to:
- key item: 19th-century church key

Thank you so much for this. The amount of effort which went into it must’ve been immense and it’s very helpful!
LikeLike
Just finished copping it down. and excited. Yours is only one that is very detailed. will let you know how I did.
LikeLike
This is the most helpful walkthrough I have ever used. You will be in my prayers…
LikeLike
This is, by far, the best and most comprehensive guide I’ve seen. Thanks so much for all your efforts!
LikeLike
Thank you so much for this!
LikeLike
thanks a lot
LikeLike
Shouldn’t put the end game part so high up because I accidentally spoiled the whole ending for meself, I think it would be better if stuff related to the end game should be at the bottom with a proper warning
LikeLike
hey! Thank you, helped a lot when I was stuck. Just a note, where u put “Document: Coroner’s undisclosed report (top drawer)” is actually the public report.
LikeLike