Ian here—
Liz Ryerson’s Problem Attic (2013) is a classic of the personal games movement. It is also notoriously difficult, for a number of overlapping reasons. I have come to realize that there are no real walkthroughs of it online, to help players that might be interested in examining Ryerson’s game and seriously considering its themes, but simply cannot get through an especially tricky area without help. I have decided to rectify this, before I teach the game for a class.
If you are looking for pedagogical notes or analysis, be forewarned: there will be none of that in in this post. This is a walkthrough, pure and simple. I’m planning on posting something more genuinely analytical on this game in the weeks ahead, but first I thought I’d do the world a public service. (If only making walkthroughs was something one could put on a CV…)
Before I begin, credit where credit is due: When I myself was struggling with this game, I found ample help in the form of Brendan Vance’s YouTube video Revisiting Problem Attic. Despite the real benefits I got from Vance’s video, I think that this walkthrough serves a need that Vance’s video does not, for two reasons. First, Vance’s video its not really a “walkthrough”: it’s more of a Let’s Play/video criticism hybrid (not dissimilar with what I’ve been attempting to do in the “Let’s Study” videos I recently inaugurated). As a result, as insightful as it is, it is also far too long to effectively serve the needs of someone just looking to get past a particularly tricky puzzle.
Secondly, to be frank, Vance is rather condescending to players who are stuck at various portions of the game, frequently stating that he thinks solutions to puzzles are perfectly well telegraphed. Given Vance’s otherwise sharp analysis, it is disappointing that he adopts a typically “get gud” attitude towards viewers who might find the game unapproachable. I suppose it’s the pedagogue in me that made me want to put together a guide that passes no judgement on stuck players. Really, it’s okay to get stuck—the game is hard, and confusing!
If you want to, you can view the video version of this walkthrough quickly in its entirety, by checking out the relevant YouTube playlist here. Below, though, I’m going to be embedding each video, along with some extra comments.
Act I
Problem Attic is divided into three distinct phases, each of which riffs on the previous phase, remixing it, “glitching it out,” and just generally making it more difficult, both mechanically and interpretively. I’m going to follow Vance’s lead here in terming these phases “acts.”
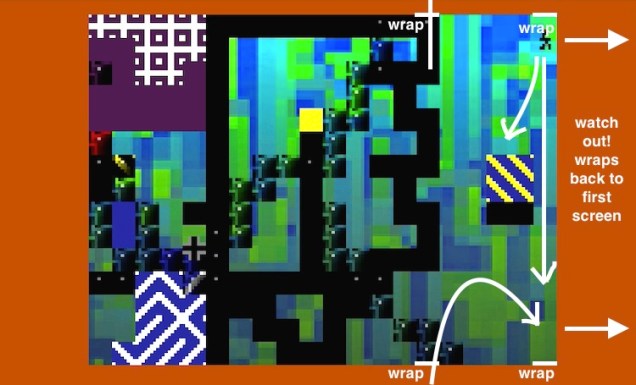
In the first two of these acts, players must traverse an “overworld” to get to the game’s levels, represented by glyphs residing in several different-colored rooms. Here is a map to the first act’s overworld:
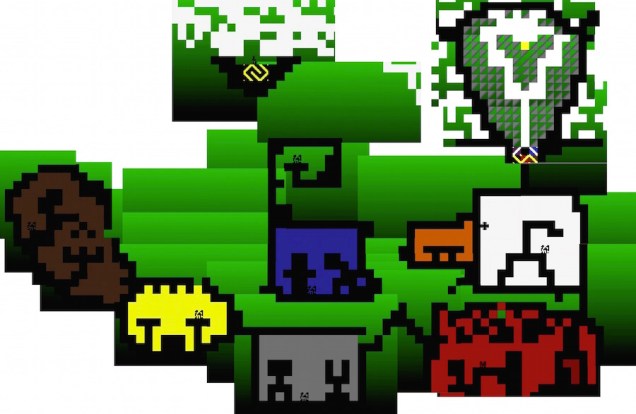
The rooms open in a specific order, as indicated below.
Act I, Level 1: The Colorless Room
Jump down from the “landing pad.” What you’re looking for is a room without a background color, that simply reproduces the overworld’s general background green gradient. Jump up into it. When you touch the glyph, you will be transported to the first level.
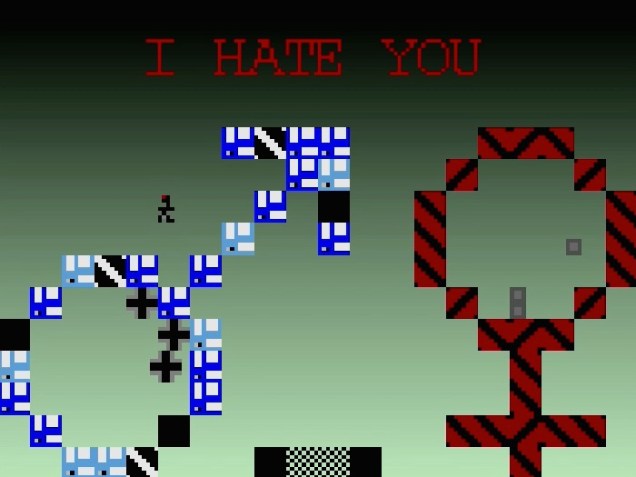
This first level introduces you to two of the game’s elements. The text, “R” to Restart, lets you know that you can hit the “R” button on your keyboard to re-set the level. As the game progresses, the function of the “R” button will sometimes change, without warning. In the first few levels, though, it’s a handy reset button.
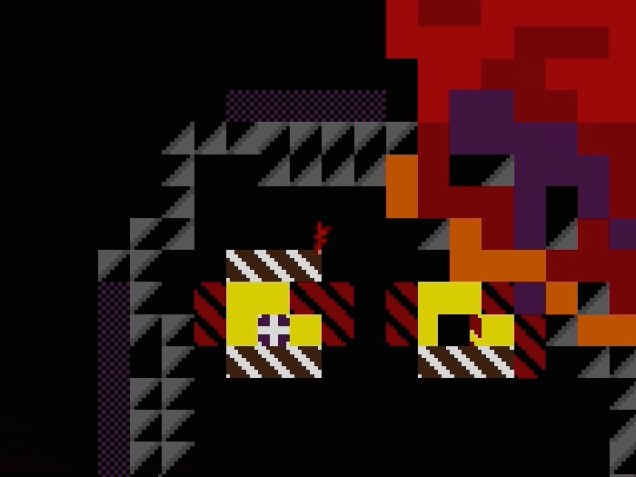
The second element is the plus sign that’s chasing you. There are many throughout the game. Some are more aggressive than others. If they touch you, the screen will shake violently. For now, avoid this one. Jump on the black platform, then the black-and-white striped platform, then the black-and-yellow striped platform. The area with a red and yellow pattern is the exit. Your character just needs to make contact with it to finish the level.
You’ll notice that the two gray blocks near the bottom look like platforms, but they can’t be jumped on: your character just passes in front of them. Figuring out which color tiles your character can jump “on,” which they’ll “pass in front of,” and which they’ll “pass behind” will soon become one of the central challenges of the game.
Act I, Level 2: The Gray Room
This level’s pretty simple: run to the right, jump down to the platform, and jump across back to the left to touch the red-and-yellow patterned area.
There are two things that can trip you up here, though. First, your character passes behind the blue tiles. This means, just as you’re making your first jump to the black platform all the way on the right side of the screen, your visual representation onscreen will suddenly disappear. This can be very disorienting.
Secondly, it’s possible for the herd of plusses to block your way to the exit. This is especially likely to happen if you spend some time being bewildered over where your onscreen avatar suddenly went. It’s simple enough to fix: just hit that “R” button to reset.
Act I, Level 3: The Blue Room
This level presents a significant platforming challenge. It’s very tall, and at first it seems like the only way to get to the top of it is to jump on a series of seven moving platforms on different height tiers. This is difficult for a number of reasons. Your jump is very high, and you fall slowly, meaning that you have to perform lots of adjustments to properly hit the small, fairly quick-moving platforms below you. Once you do successfully hit them, you’ll discover a nasty surprise: unlike in, say, Mario, your avatar doesn’t match the velocity of the platform you landed on, staying rooted in relative space the way we normally do when riding something. Instead, your character is stationary, the platforms are “slippery,” and will move out from under you unless you’re constantly tapping the right and left arrow buttons to match its speed. On top of all of this, one of the plusses is chasing you, and, if that wasn’t bad enough, whenever one of the platforms collides with the plus it instantly changes direction.
You can complete this platforming if you really want to, but actually there’s a trick to this level: go to the right side of the screen, wait for the plus to approach you, and then jump on it. You’ll have to deal with the screen shaking, but, in return, you will be lifted up to the exit you need to hit. You can control your direction by quickly tapping the arrow keys back and forth.
It’s best to learn this trick now—although it is optional in this level, it will become mandatory in level five.
Act I, Level 4: The Yellow Room
This level is not hard, per se, but it is tremendously visually confusing. First off: you can jump much higher in this level than you have previously been able to. This means that, almost immediately upon jumping, the screen is going to abruply change to adjust to your new position. This is quite visually confusing if you weren’t expecting it.
After you get out of the initial “entrance screen,” you’ll find that the screen follows your character in a much less confusing way. There is, though, an additional danger in this level. A new element is introduced—a new “enemy,” I suppose we could call it, although like the plusses they have their uses—the gray squares. Gray squares send you back to the initial spawn point of the level, undoing any progress you’ve made. You see this happen to me once in the embedded video. Since you haven’t been given any warning that this might happen, it can be very disorienting.
Aside from those nasty tricks, the platforming in this section isn’t actually that hard. (I struggle with it some in the video, but it’s mainly just a matter of predicting where you’ll end up on a screen you can’t yet see.) You’re trying to get to the right side of the screen, where you’ll fall down and hit the exit at the bottom.
Act I, Level 5: The Brown Room
This level can be a monstrous thicket of trial and error.
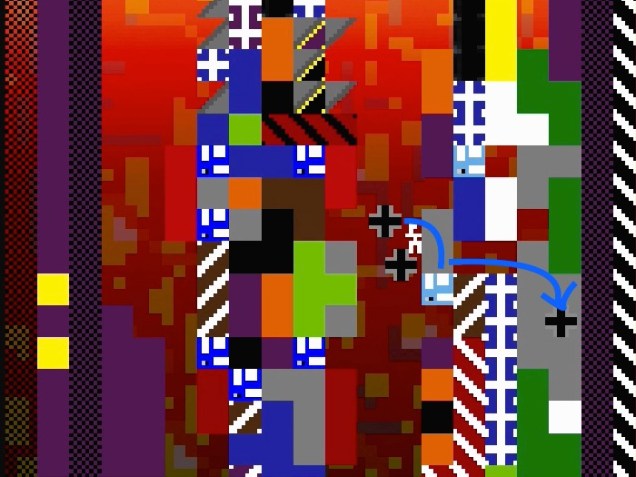
Your goal is all the way to the right side of the screen, at the top. As we did in level 3, you’re going to have to hitch a ride on a plus upwards. You can’t do that from the outset, though: the exit has kind of a “locked gate” barring us from it (this isn’t at all clear, as we can’t see the exit beyond the gate … frustrating). So, first, we need to hit a switch. Of course, in this game, figuring out what a “switch” might be requires a lot of guesswork. In fact, just figuring out which tiles you can jump on requires a lot of guesswork.
Make your way back to the start of the level. (There’s a little pit that the plusses can trap you in if you’re not careful. Remember to use that “R” button.) The thing you want to hit is the single square tile with the red-and-yellow striped pattern we’ve come to associate with exits. Getting up there requires a pretty substantial amount of guesswork, as you’re dealing with a confusing array of tiles you pass behind, pass in front of, and that actually support your weight.
The trick is this: follow the path of the white tiles. You pass in front of them, rather than landing on them, but the tiles beneath them support your weight. When you hit the red-and-yellow switch, you’ll hear a sound (remember this sound: it’s our “unlocking” cue). Now, make your way over to the right, and ride the plusses up.
Act I, Level 6: The Red Room
Don’t worry: your keyboard is not broken. Nor is the game. Well, it is, but on purpose.
This level is designed to frustrate you to the point of exasperation. Every third or fourth time you press the “up” arrow button, your character will fail to jump. The end result is the infuriating impotence that one will sometimes feel when dealing with a hardware failure, but it is purposefully deployed. Be patient. This is not your fault. This is just something you need to get through.
You might think that the best option here is to head to the left. It has colorful, solid-looking platforms. However, due to the newly-sluggish controls and the plus that is doggedly pursuing you, you are likely to get stuck over here before you can make any real progress. If you do so, hit the “R” button to escape.
(You might notice that, in this level, the “R” button kicks you out of the level entirely, rather than simply re-setting it. It’s an odd detail, and it mainly seems to be there to prepare us for the fact that the “R” button’s function will be mutating in Acts 2 and 3.)
The trick here is to ignore those promisingly, solid-looking tiles on the left. What actually want to climb up are the tiles that surround you right when you initially drop into the level. This is unintuitive. The “thatched”-style pattern on these tiles makes them seem insubstantial. They’re downright difficult to see against the background. If you’re having trouble, pay attention to where they are when they flash yellow, in a “lightning”-like effect. (This sort of keeping track of hard-to-see platforms through brief flashing will come up again, later.)


From there on, it’s just a matter of careful platforming.
Act I, Level 7: The Orange Room
We see the return of the gray squares in this level, and they behave a little differently this time. Like the plusses, they now pursue you, fairly aggressively. If you somehow got through the yellow room level without encountering them, you will almost certainly not be as lucky here.
If you’re smart, though, the gray squares can actually be useful in this level. Much like in level three, we can utilize them creatively to make an otherwise horrendously difficult level much easier.
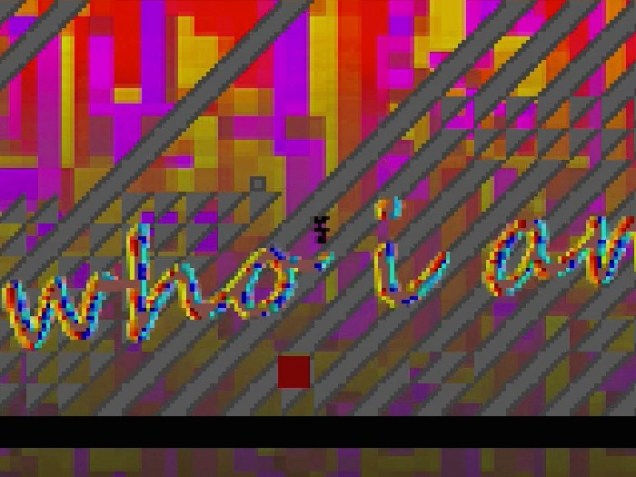
So, the deal is this: There is not one exit to this level. There are several. They’re not red-and-yellow stripped tiles this time. They’re just yellow tiles. And only one of them is active at a given time. There’s no visual indication of which one is active. The only indication is the text at the start of the level: “i can’t remember maybe it was x,” where “x” is the corresponding number Ryerson has assigned to the exit. But there’s no indication of which yellow block matches which number!
So, here’s one way to do this level: Jump around, doing some platforming to try and get to all of the yellow tiles you can. (You’ll notice, as you’re doing this, that the floor of this level wraps around to the ceiling.) Try not to get hit by the gray squares. If you do, just start over, trying all of the exits again.
Here’s a better way: never leave the first platform. Hit all of the gray squares that you can, and keep trying the nearest yellow tile, right below you, which is pretty easy to jump to. Is it 2? No? Okay, hit a square … 4? No? Okay, then … reset again …
Some might call this cheesing the level, but I call it using every element to your advantage. I’m not sure if the numerical values of the yellow tiles are randomized, but in the video above you’ll see that the nearest one was assigned as “1.”
Act I, Level 8: The White Room
In the first half of this level, just make your way left, as fast as the progressing screen will let you. (Which is not very fast, at all.) The plusses are quite aggressive. Try to avoid them, as best as possible. Don’t worry too much, though: you escape from this first part of the level not by touching anything yourself, but rather by a plus touching the purple-and-yellow striped tile on the top lefthand side. This will happen even if you are pinned down by the other plusses. Once you’ve teleported out, jump up to the top of the structure (which is actually part of the overworld map) and down to the next yellow teleport point.
The second half of this level is very difficult. There’s no trick to it. There’s no puzzle. It just requires significant platforming skills to escape from. There’s no other way around it. If you just don’t have the fine motor skills, you might get stuck here. It’s the only real part of the game that’s about the speedy execution of exact jumping maneuvers.
What you need to do is this:

The numbers represent spawn points and teleport points. You begin at 1, and teleport/spawn to 6. The path from 2 to 3, in the brown blob, is probably the trickiest, and will take some practice. Once you spawn a point 4, you’re pretty much home free: the hardest part is in the first half.
Once you finish this, you’ll be deposited into what looks like an altered version of the game’s main menu. Some early players assumed they had finished the game when they reached this point. Pro tip: you have not. (Ryerson even attempts to head off this confusion in the games instructional text, where she explicitly writes, “note: if you reach a screen that you think is the ending but you’re not sure, you’re not at the end. you haven’t reached the ending until the game literally tells you it’s the ‘end.'”)
Press “X” to begin … Act II.
Act II
The overworld to Act II is different in a way that is very distressing. Your avatar is now white, crumples, and seemingly mangled. You can’t jump. You can only slide along, and fall off the edges of things as gracefully as possible. And, oddly enough, you now “fall upward”: even though the overworld map basically remains the same, gravity has reversed for you, and you now adhere to the bottom of the structures. Falling all the way up to the top of the screen will cause you to wrap around, and start falling again from the bottom. In this inelegant way, you can again make your way to each of the rooms, in the same order. Until … well, you can’t. (You’ll see.)
Act II, Level 1: The Colorless Room
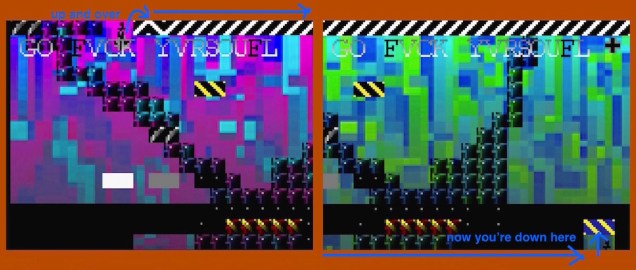
Flop your way over, as best as possible, to the room without a background color. The level in here resembles the first “colorless room” level, but with some new, profane flair.
In this version of the level, which we’ll call the “go fuck yourself” variation, you are expected to apply some of the lessons learned throughout the course of Act I, while also having new bits thrown into the mix. The previous lesson to apply has to do with the plus: you’ll have to ride it up to the top of the screen. The new bit has to do with some glitched-out, clipping-through screen wrapping that will become a major mechanic in this act and the next.

Ride the plus to the top of the screen, where the gap in the black-and-white striped tiles is. Jump through that gap correctly, and you’ll be greeted with the sight of your head poking up down in the gray area at the bottom of the screen. Continue over to touch the exit tiles.
Act II, Level 2: The Gray Room
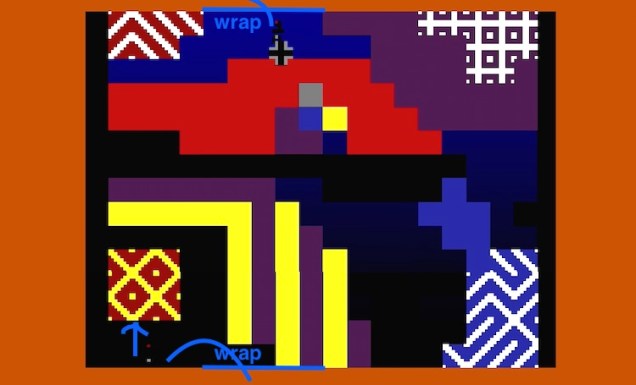
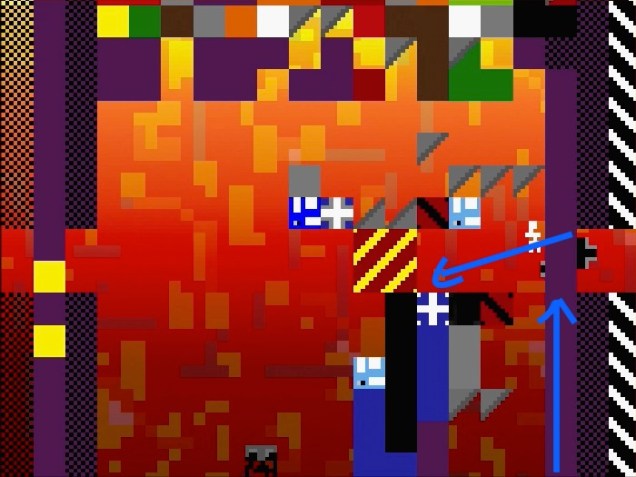
You would be correct if you assumed that the trick in this level has to do with riding the plus again. You would be incorrect, though, if you assumed it had something to do with replicating your path through the original version of this level. Instead, it again has to do with clipping through certain tiles, and wrapping around to unexpected places.
This time, the blue area at the top gives us unexpected access to the black area that surrounds the exit teleport point. Coax the plus out of its hiding space below to ride it up there.
Act II, Level 3: The Blue Room
More of the same, but more complicated this time. First off, you’ll actually have to do the platforming in this level this time around. You need to make it to the top lefthand side of the screen. Best of luck.
Once you’re at the top, march over to the left edge of the screen. You’ll drop down into … something. I really don’t know what’s going on here. It has something to do with teleport points on the right side of the screen, but all that’s really evident is that it involves a whole lot of falling and wrapping through, Portal-style. Exactly what’s happening is difficult to discern, given how fast the screen is flashing. (Definitely do not play this game if you have epilepsy.)


Adjust your aim enough in the blind, and eventually you’ll end up in this little crevice on the left side of the screen. Drop down into the abyss below. You’ll end up on the top of the screen, where you can move right until you jump into the exit point.


Act II, Level 4: The Yellow Room
It’s not actually possible to get inside the yellow room in this version of the overworld. Instead, its glyph falls out, and you have to chase it down.
Once you are inside the level, please calm down. Your brain hasn’t broken.
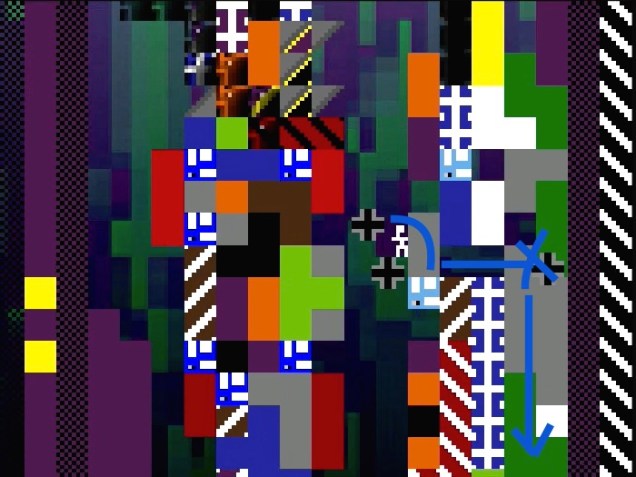
You’re not controlling your avatar in this level. Instead, you’re controlling the trajectory of the plusses. Some of them move on the x-axis with the help of right and left arrow keys, and some of them move on the y axis with the help of the up and down arrow keys. Honestly, this level is a bit like playing foosball, with your usual avatar as the ball. Think of it that way, if it helps.
You can break this section down into three core maneuvers. First, lower the y-axis plusses until one of them is positioned in such a way as to receive you if you get knocked off of your spawning platform. Then, use the x-axis plus to knock yourself down onto that plus.
Ride the y-axis plus upwards until you reach another gap in the wall (shown here, if you can make it out through the nonsense mishmash of colors). Using the x-axis plus as a stopper for the plus you’re riding on if you need it, again adjust the plus to the right to that it’s set up to receive you. Then, bump yourself from your current position. You’ll slide down onto the waiting plus.
Ride this plus up again. This next part is tricky, because the purple tiles occlude you. But you just want to putt yourself perfectly across the gap to the left, and into the exit point.
Act II, Level 5: The Brown Room
Don’t look now, but the function of the “R” button has changed. Huh.
This level has transformed into something completely unrecognizable from its Act I version. It’s now a collect-a-thon. There are two different resources to collect: black glyph tiles that look very much like the glyphs you use to enter the levels. These give you black “F” points. If you collect six of them, you’ll hear the “unlock” noise (just about the only thing that sticks around in this level from its previous manifestation). You have unlocked the way to the exit.
Collecting yellow tiles gives you a consumable resource: “M” points. This resource is tied to the new function of the “R” key, which is to teleport you two tiles to the right. You consume one “M” point when you do this.
Self-motivated teleporting is new to this game, and here’s how it works: depending on where you’re standing when you do it, you might just teleport yourself past an obstacle. That’s straightforward enough. The other option, though, is that you’ll teleport inside of a tile that you couldn’t previously get through. Now, the whole landscape has changed quite radically, as what was once an obstacle is now the medium you travel through, and vice versa. It’s really quite brilliant, although, of course, not at all explained.
I spend a bunch of time in the video getting a bit lost looking for the exit, but it’s really fairly easy to get to. Just keep going down and to the right, and you’ll eventually find it.
Act II, Level 6: The Red Room … or … maybe not???
Once you carefully flop your way to the red room on the overworld, something strange will happen: your character refuses to go in. Instead, they use the teleport trick completely of their own volition to glitch themselves into the room’s black border.
You’re now stuck in the space between the rooms. Keep falling up, as far as you can, and you’ll reach that thing that’s above the white room, where we entered the really hard section that closed out Act I. There’s an edge here you can pass through, into a severely shaky and shuddery version of the Act II overworld. Continue on up, as far as you can, and ….
Congratulations. You just glitched yourself into Act III.
Act III
It feels like an accidental sequence break, but it’s not: it os a moment that has been deliberately constructed by Ryerson. We’re in act III now. (Act II has no proper red, orange or white room levels.)
Act III has no overworld. The levels all lead directly into one another, after a short text or vignette to break them up. There’s no real reason to refer to them by their room color anymore, but I’ll keep doing it just because it’s convenient.
Act III, Level 1: The Colorless Room
Act III continues on the trend established in Act II of forcing you to clip through the edges of the screen and wrap around to new areas. It’s much more devious, however, because Act III makes it more likely that you’ll visually lose your player-character in the process, and have to operate blindly, guessing as to where you are and where you need to be.
We get this right away in the first level. It’s very similar to the prior version: you need to clip through the exact same part of the upper edge of the screen. Once you do so, though, you need to keep walking right, to an entirely new screen. You can’t see yourself during this entire walk, although you can roughly judge your position by the plus that’s dragging along, following you.
It’s also a good thing to note that in Act III your exit teleport tiles are blue-and-yellow striped, rather than red-and-yellow striped.
Act III, Level 2: The Gray Room
Again, you’re using the plus to move up, and again, you’re not aiming at the exact same thing you were before.
This time, jump into the “cloud” of purple squares on a white background on the upper righthand side of the frame. Once you are inside it, travel right to transition to a new screen.
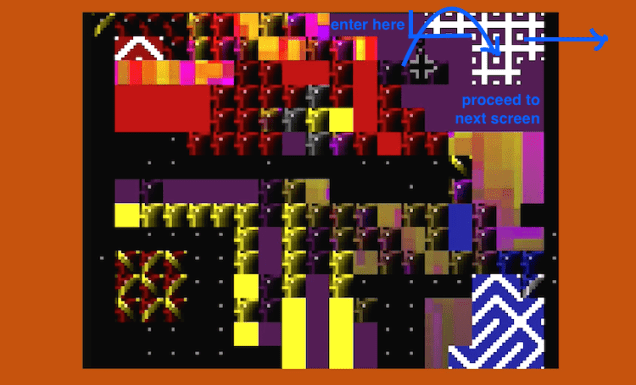
Navigate the black pathway, until you get to the ledge near the upper righthand corner. From here, you can jump out of the black structure. You will wrap down below. A good percentage of the right half of the screen wraps around between top and bottom, so it’s possible to leap off, enter into a Portal-esque endless fall, and adjust your trajectory over to the exit point in that fall.
Be careful, though: you’ll notice in my video that if you go too far to the right, you’ll wrap back over to the left side of the first screen. This is very confusing (I don’t see myself on that screen at all), to the point of making this level incomprehensible. Try to avoid it, if possible. (Sorry for getting that bit in my video.)
Act III, Level 3: The Blue Room
I’m just going to go ahead and say it: I CANNOT figure out exactly how the spatial relationships work in this one. I mean, I did it. You can watch the video. But if you held a gun to my head, I still couldn’t make a map of the type I’ve been doing with the other levels, laying out where you teleport and where you wrap around and where you end up when you fall off of what. I just use trial and error. If you can make more sense of it, be my guest! In the meantime, here’s the video.
Act III, Level 4: The Yellow Room
The pre-level way to this one is actually a little tricky. You find yourself in an enormous room, filled with text. There are floating platforms dotted about, but you don’t actually need them, because you can jump enormously high—all the way to the top of the room, in fact. It takes me a little bit of fiddling around to find it in the video, but there’s a specific spot you can stand on where your jump will send you up through the ceiling. You’ll wrap around to the floor, and be able to touch a red-and-yellow transport point.
Once you’ve reached the level proper, however, you’ll find that it is, shockingly, actually easier than its Act II counterpart. It’s basically exactly the same, except in the second maneuver, you set up the plus so that you collide with it and it stops your forward trajectory, rather than setting it up so that you land on it.
Act III, Level 5: The Brown Room
The same map as Act II, but with a new twist (one that is entirely unexplained, of course). This time, the only thing you need to do to get out of the level is to collect 12 “M” points. There aren’t even any “F” glyphs to collect, so just go after the yellow tiles.
Two things to be careful of in here: First, there are some gray squares lurking about, ready to teleport you back to your initial spawn point and make you lose all of your collected “M” points. They are stationary this time around, which in theory makes them easier to avoid, but also tends to make them harder to see. Secondly, don’t have an itchy finger on the “R” button this time around. Your resource for teleporting is also the resource you need to collect, so plan carefully. If you absolutely must teleport, try and to it in a place where you can clearly see you’ll get a net gain in “M” points, rather than just break even.
Endgame
There are gray squares pursuing you, and a big weird floating cube, and it’s all so very confusing in here. To simplify things: Your “R” button teleports you in this level, just like it does in the brown room level. You do not consume any resource, so you can use it as often as you like.
Use the teleport frequently to escape the gray squares, to get through obstacles, and to make your way to the bottom of the screen. Once you get there, you’ll be able to glitch it so that you wrap around to the very top of the screen. Here, along with the floating text, “i don’t know who i am,” you’ll see a single tile that blinks between black and red. Touch it.
At first, it will seem as if you’ve transformed into a white version of yourself, similar to the version that you navigated the Act II overworld with. This is not quite the case, however. You’ve actually turned into two versions of yourself. You have multiplied. The screen is only following one version of you. The other is replicating your movements, but in a completely different part of the map. You need to find it, and touch it to re-join it.
There’s no trick to this. It can be laborious. Just keep teleporting around, and keep your eyes open.
Something to note: in the video I made, I actually touched the blinking box a second time, and created a third copy of myself. It’s not necessary to do this, but neither does it seem to hurt. You don’t need to touch every copy of yourself. You just need to rejoin with one. So creating more than two copies might even make this section easier! I’m not sure.
Next up, platforming in the dark. One trick that might help here is to jump while the screen is still black, so that you’re able to see the flash of the platform as you adjust your trajectory on the way down.
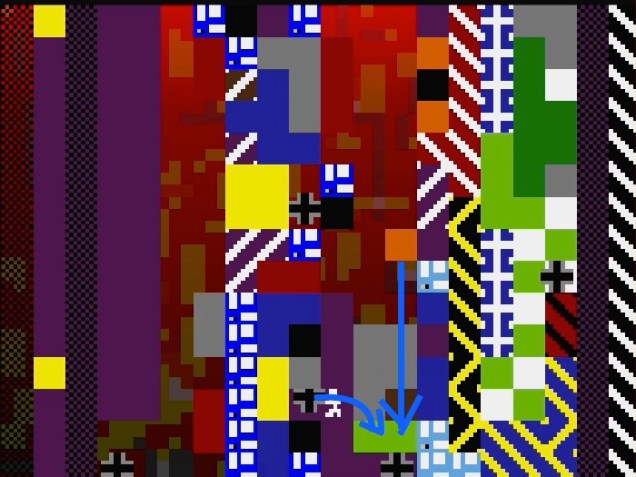
In the next portion, you’re eventually going to want to climb the structure that reaches upward. But, first, you need to find a switch that will unlock the exit. It’s difficult to describe anything in spatial terms here, but it looks like this:
After you find it, climb up and jump into the yellow door-like tile. The screen will shake for quite awhile, and eventually you’ll reach the game’s final coda. It’s easy enough to navigate.
